

01Getting started
Your first game server at Nexthosting – quick start
How to order your first game server at Nexthosting, open the panel and invite friends – ten steps to your first join.
In short
You register, choose your game and a plan in the shop, pay, and usually wait only a few minutes. Then you open the panel, check that your server is running, and give your friends the address. This quick start takes you there in ten steps.
- Account
- Choose game and plan
- Configure
- Pay
- Server is readyusually after a few minutes
- Open the panel
- Join
The ten steps
Section titled “The ten steps”-
Create a customer account. Open nexthosting.net and click Registrieren (register). You can log in with Discord, Google or Twitch, or create an account with email and password. The details are on Register and log in.
-
Choose a game. In the shop, you find the game servers under Produkte (products). There are currently 28 games. The guides for the individual games are on the page All games.
-
Choose a plan. The plans are usually called Basic, Advanced, Premium and Community and differ in performance and features, not in player count. There are no fixed slots; you set the player count yourself later. As a guide: for Minecraft, Basic comes with 4 GB of RAM and Advanced with 8 GB. Click Paket wählen (choose plan) on the plan.
-
Configure. On the product page you set how you want to pay. Choose the billing type Vertrag (contract) or Prepaid, the payment interval and, for a contract, the minimum term. Under Zusatzleistungen (extras) you can optionally add your own IP address or support packages. All of that is voluntary, and the default is always the free option. If you have a discount code, enter it in the field Du hast einen Rabattcode? (Do you have a discount code?) and click Prüfen (check).
-
Add to cart and pay. In den Warenkorb (add to cart) takes you to the next step, and from there to payment. Choose a payment method. Important: with SEPA direct debit, the order waits until the direct debit is confirmed. That takes about 12 to 13 days; until then your customer account shows “Lastschrift läuft” (direct debit in progress) with the expected date. If you need it fast, use PayPal or credit card. More: Ordering and Paying.
-
Wait for provisioning. Once your payment arrives, Nexthosting sets up the server automatically, usually within a few minutes. The server appears in your customer account under Deine Produkte.
-
Open the panel. You get into the game server panel at panel.nexthosting.net directly from your customer account, without a password: Dienste (services) → Deine Produkte (your products) → Ansehen (view) → Gameserver-Panel öffnen. For some features, for example SFTP, you need a separate panel password. How to set it is explained under Open the panel.
-
Check that the server is running. At the top of the overview you see the name, status and address of your server. If it says Läuft (running), everything is fine. If the server is not running, start it with Neu starten (restart).
-
Look into the console. Under Konsole (console) you see what your server outputs. Many lines appear at startup. Errors are marked red, warnings yellow. You can tell the first start is done when the output calms down. More: Console and controls.
-
Join and invite friends. Copy the address from the panel, for example
195.201.57.54:35600, and enter it in your game (see the table below). If friends should help manage the server, you can invite them as sub-users: Friends and sub-users.
The steps in screenshots
Section titled “The steps in screenshots”The product page in the shop shows the features of your plan on the left and the price summary on the right.
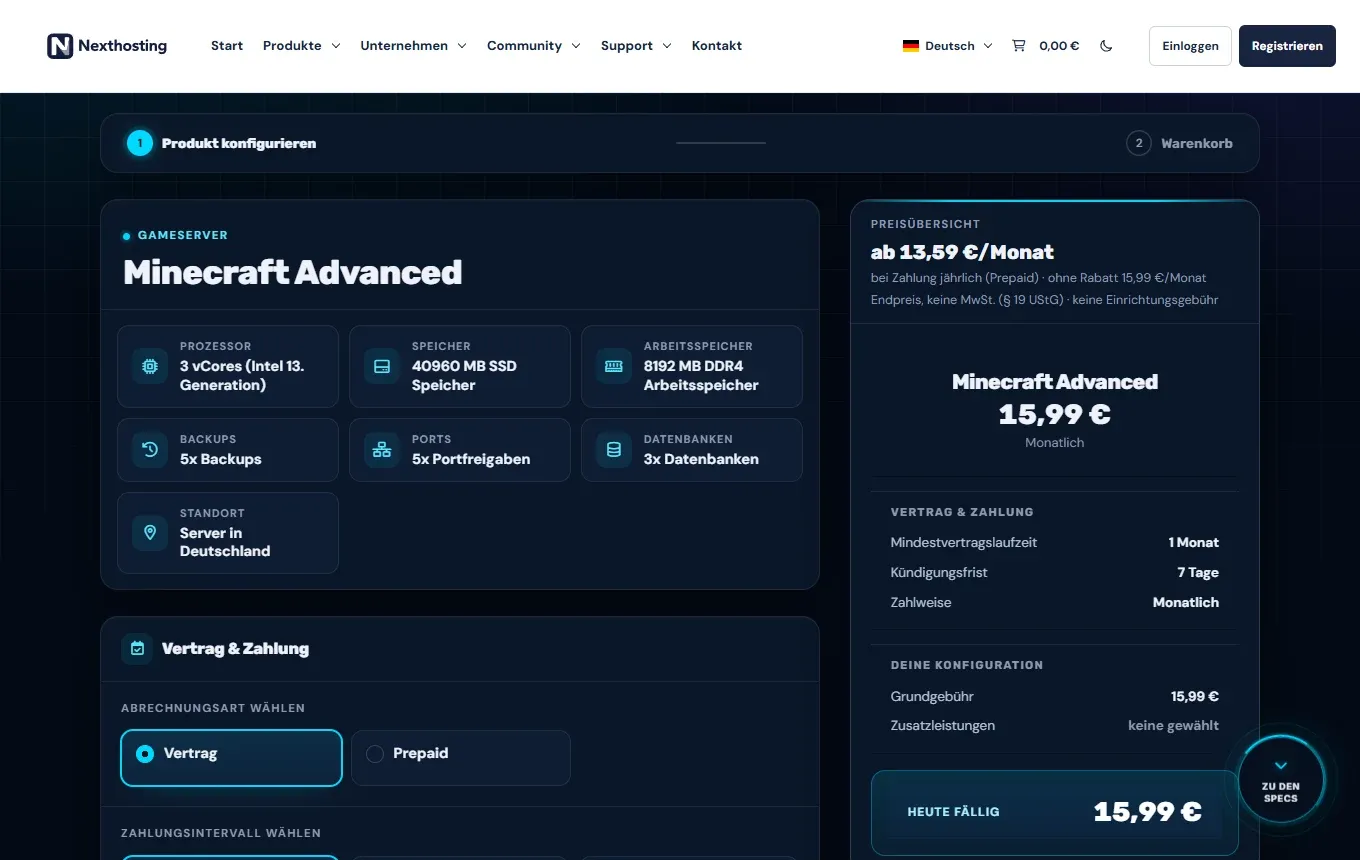
The product page when ordering. The list below explains the numbers in the image.
- The steps: first Produkt konfigurieren (configure product), then Warenkorb (cart)
- The features of the plan (processor, storage, RAM, backups, ports, databases)
- The billing type Vertrag (contract) or Prepaid
- The price summary with the amount due today
After provisioning, you see this overview in the panel:
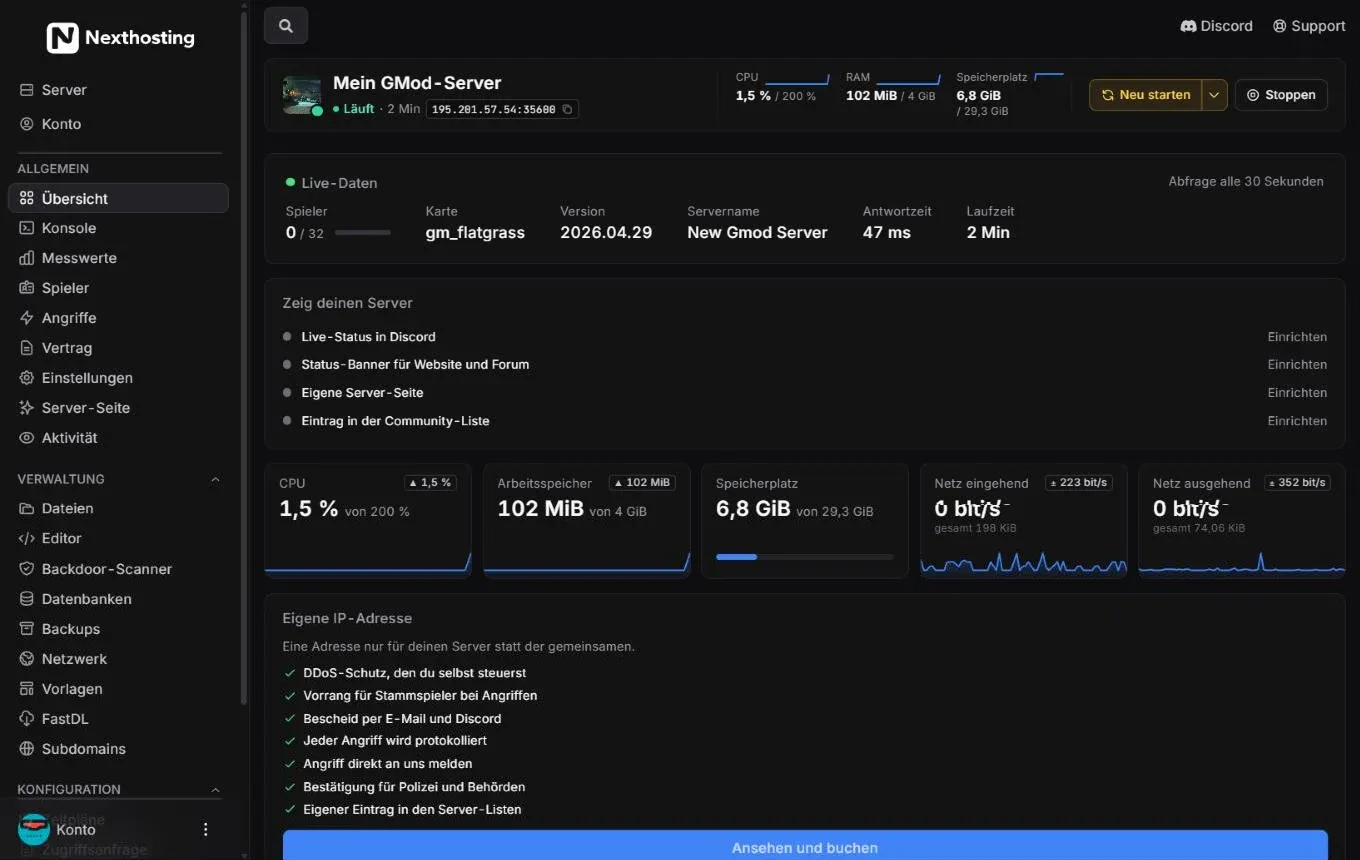
The overview of your server in the panel.
- Server name, status and address to copy
- Neu starten (restart) and Stoppen (stop)
- Sidebar with all areas, for example Konsole (console), Dateien (files) and Backups
- Live-Daten (live data) with player count, map and response time
How to join
Section titled “How to join”How you enter the address depends on the game. The address has the form IP address:port.
| Game | How to join |
|---|---|
| Minecraft | Multiplayer → Add Server → enter the address |
| Garry’s Mod, Counter-Strike, Left 4 Dead 2 | Enter connect IP-address:port in the game console |
| Terraria | Multiplayer → Join via IP |
| Other games | Server browser or direct IP entry in the game, see the games page |
If you have set up a free subdomain under .nexthosting.app, you can enter that instead of the IP address: Network, ports and subdomains.
What makes sense next
Section titled “What makes sense next”- Create a first backup: Backups and databases
- Set up mods or plugins: Templates, mods and modpacks
- Schedule restarts automatically: Schedules and restarts
Frequently asked questions
Section titled “Frequently asked questions”How long until my server is running?
Section titled “How long until my server is running?”Usually a few minutes after your payment arrives. With SEPA direct debit, provisioning only starts once the direct debit is confirmed.
Can I change the plan later?
Section titled “Can I change the plan later?”Yes. Upgrades are possible at any time and are billed pro rata; downgrades take effect at the end of the billing period. Your data is kept. More: Change plan and upgrades.
Do I need any prior knowledge?
Section titled “Do I need any prior knowledge?”No. The panel runs in your browser, and you do not need to install anything. For files you can use the file manager in the browser or work via SFTP: Files, editor and SFTP.